Except for work computers with GNU/linux, the last of which was retired in 2008, my GNU/linux computers have been outdated hand-me-downs. And when the P4 I got back in 2010 went belly up, I figured it was time for trying a modern machine.
Note: I wasn’t going for a top-of-the-line gaming computer with high performance everything. Just a modern state of the art computer.
I wasn’t satisfied with the combination of price and specs on the desktop computers sold by the consumer electronic retailers, so I asked an old colleague who likes building his own computers (thanks Alexey!) to help me come up with an order for components that would work when I put it together. This is what I ordered:
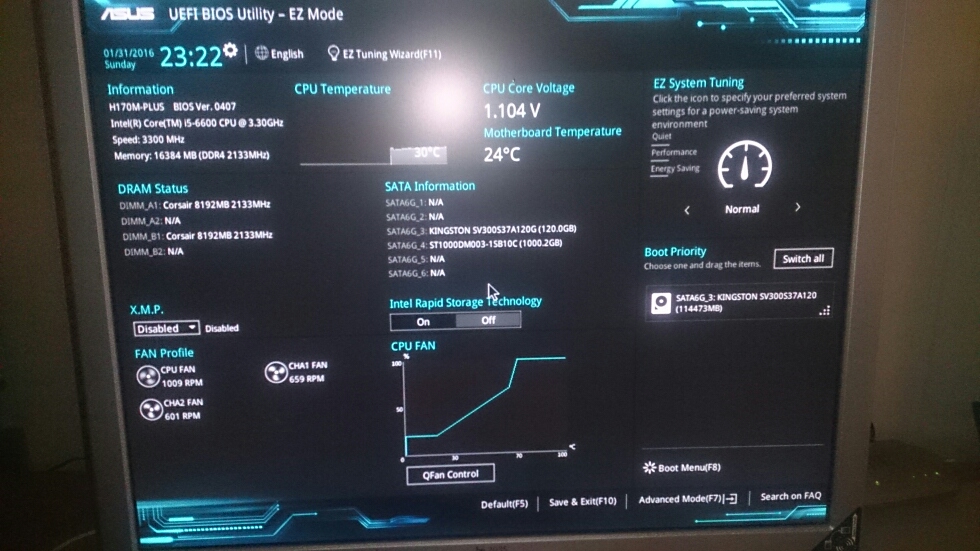
- Main board: ASUS H170M-PLUS, Socket-1151
- CPU: Intel Core i5-6600 Skylake
- Memory: Corsair Vengeance LPX DDR4 2133MHz 16GB
- SSD: Kingston SSDNow V300 120GB 2.5″ OEM
- Hard disk: Seagate Barracuda® 1TB
- Cabinet: Fractal Design Define S Black
- Power supply: Corsair CX500, 500W PSU
I won’t spend much time on the task of putting the parts together to make a working computer, suffice to say that with re-watching this video, frequent phone calls to Alexey, compared with close reading of the documentation (Alexey told me to do that), I got it working and was greeted by the fancy screen that has taken the place of the BIOS.
I tried, and gave up on making PXE boot work for the debian install on the UEFI BIOS, and put the debian-8.3.0-amd64-netinst.iso image on an USB flash drive. I then inserted the USB flash drive in one of the USB3 connectors on the front of the cabinet, pressed F10 in the UEFI BIOS, and then kept F8 pressed F8 until I got to the boot menu.
In the boot menu, I selected
UEFI: Generic Flash Disk 8.07, Partition 1 (7640MB)
and then pressed ENTER.
In the debian installer:
- Selected the “Graphical installer”
- Selected “English” as the installer language
- Selected “Norway” as the time zone
- Selected “en_US.UTF-8” as the locale
- Selected “Norwegian” as the keyboard layout
- Gave “lorenzo” as the computer name
- Gave “hjemme.lan” as the domain name
- Set the root password
- I created a user for myself, and set the password
- Partitioned the disks manually:
- Partitioned the 120GB SSD. I put the root partition on the SSD to get a quick startup of the system, and to get fast startup of applications. I also had to put an EFI partition here. Without an EFI partition, the base-installer failed with a “No space left on device” error message:
Number Size File system Name Flags #1 1GB fat32 efi boot,esp #2 119GB ext4 root - Partitioned the 1TB HDD:
- I put the swap, sized to twice the physical memory, (something I’ve been doing since I installed my first GNU/linux box back in the 90-ies)
- To avoid SSD wear from frequent writing, I put the /var partition (where /var/log resides) on the spinning disk
- Finally, I made the rest of the disk the /home directory
Number Size File system Name Flags #1 32GB linux-swap(v1) swap #2 100GB ext4 var #3 868GB ext4
- Partitioned the 120GB SSD. I put the root partition on the SSD to get a quick startup of the system, and to get fast startup of applications. I also had to put an EFI partition here. Without an EFI partition, the base-installer failed with a “No space left on device” error message:
- In the installer, I selected a package mirror from Norway (it doesn’t really matter which one, because of the NIX), selected “No proxy”, and continued
- I let the installer install GRUB on the hard disk
- During the installation of the system, the installer stopped with the following error message:
Unable to install busybox
An error was returned while trying to instal lthe busybox package
onto the target system.

Check /var/log/syslog or see virtual console 4 for details
- I googled for the error message, found this ubuntu bug report, and tried the following workaround from a comment on the bug, and the installer continued past the problem spot.The workaround/hack, was to boot the installer, press Ctrl-Alt-F2 to get a virtual console, and at the prompt in that console, type:
# while true; do rm /var/run/chroot-setup.lock; sleep 1; done
and then switch back to the installer in Ctrl-Alt-F1 and continue with the installation
- I let the installer run until completion, and pulled the USB flash drive from the USB3 connection (probably not necessary, since pressing F8 was necessary to get to the boot menu in the first place), and let the computer reboot
- The computer booted with the familiar debian gdm login screen, and a disappointing 1024×768 screen resolution
- I logged in to see what the display settings of the desktop had to say, but the display setting had 1024×768 as the only choice
- I let apt-get update the distribution
apt-get update
apt-get dist-upgrade
- I rebooted again after the update had completed, but the update wasn’t enough to fix the screen resolution, the display still had 1024×768 as the only available resolution
- This was my first test of Gnome 3 (when “gnome” in debian changed its meaning from the quite usable “Gnome 2” to “Gnome 3”, the old hardware on my previous debian computer wasn’t able to display anything at all), and I found it ugly and incomprehensible
- So I installed MATE
apt-get install mate-desktop-environment
and rebooted and logged in again
- This time, after logging in, I met something that looked very much like the old and familiar “Gnome 2” desktop, but still with 1024×768 as the only available display resolution
- I edited /etc/apt/sources.list and added apt lines for jessie-backports
# jessie backports (4.3 kernel)
deb http://http.debian.net/debian jessie-backports main contrib non-free
- I installed the kernel, firmware and xserver-xorg-video-intel
apt-get -t jessie-backports install linux-image-amd64 firmware-linux
apt-get -t jessie-backports xserver-xorg-video-intel
- After a new reboot I was up and running, and this time with 1600×1200 resolution on the display, which is the maximum the old display I was using would support
- Since I got a working system by using packages from backports, I didn’t make the jump to debian testing immediately, but I figured I might as well get as new packages as possible from jessie-backports, so I created an /etc/apt/preferences file with the following contents:
Package: *
Pin: release a=jessie
Pin-priority: 700

Package: *
Pin: release a=jessie-updates
Pin-priority: 710

Package: *
Pin: release a=jessie-backports
Pin-priority: 720
- Then I did apt-get update followed by dist-upgrade and pulled in new versions of many packages
apt-get update
apt-get dist-upgrade
- I used apt-get to install many familiar packages from my old system
apt-get install xscavenger
apt-get install default-jdk
apt-get install chromium
apt-get install flightgear
apt-get install oolite
- Like I always do on debian systems, I pulled in “real” firefox from Mint debian edition:
- I edited /etc/apt/sources.list file and added the apt lines for Mint debian edition
# Linux Mint Debian Edition (has firefox)
deb http://packages.linuxmint.com debian import
- I installed the key for Mint debian edition
apt-get update
apt-get install linuxmint-keyring
apt-get update
- I used apt to install firefox
apt-get install firefox
- I edited /etc/apt/sources.list file and added the apt lines for Mint debian edition
- I installed apticron that will check for updates daily and notify me about updates
apt-get install apticron
- Then I rebooted into the system I’m currently running
That’s it basically. Things seems to work out of the box, sound, video etc. (youtube doesn’t play in chromium, but it does play in firefox).

2 thoughts on “Debian “jessie” on Intel “Skylake””