I installed GNU/linux on a laptop, for the first time since 2012. And the install was mostly trouble free. I spent a little time on getting the PXE boot working and getting the wireless NIC working, but other than that everything I’ve tried has been working smoothly (display, sound, keyboard, touchpad and suspend/resume).
Back in the late 90-ies, and throughout the 00-ies, I routinely installed various versions of GNU/linux on both laptops and desktops.
I tried a lot of distros until I landed on debian sometime around 2000. It was the “boot from a floppy and install from the network” approach that sold me.
Also, the amazing way you could just “apt-get dist-upgrade” over the years, without doing a reinstall.
Still, laptops were always a bit of a challenge on debian, especially getting the wifi working.
At one time in the early 00-s, I got the wifi NIC working cutting the firmware out of the windows driver and adding it to a kernel module I had downloaded from its developer’s web page and compiled and added to the kernel. Those were the days…!
Better hardware support for laptops, was the reason I moved from debian to Ubuntu in the mid-00s, and stayed there until ubuntu decided to take pulse audio into the kernel, which caused the laptop to freeze up, with the fan howling and a hard shutdown the only solution (in 2008 or 2009, I think it was).
Then I used debian again until I aquired some Acer Aspire netbooks, that came with linux preinstalled. The preinstalled linux was based on mandrake, and eventually went out of support, while the hardware was still working. So I scrubbed the preinstalled linux and installed “ubuntu netbook edition“, which was pretty nice, and worked really well.
Worked well, that is, until canonical had the (not so) bright idea of introducing Unity. Short story: Unity did not work well on an Intel atom based system with no graphical acceleration and, in general, limited resources.
So out went ubuntu and in went debian, with a Gnome 2 desktop, set up to imitate the ubuntu netbook edition desktop.
Debian with Gnome 2, was what the netbooks were running until their SSDs died. Debian with Gnome 2, was also what I installed on what was until now, my latest linux laptop install Installing debian “squeeze” with PXE boot on a Samsung N145 Plus netbook.
In 2014 I bought a cheap laptop to replace my own netbook, and then spent a weekend trying to get the PXE boot working on the UEFI BIOS that had replaced the plain BIOS I knew so well.
I procrastinated on trying to linux-ify this laptop, so it lived on as a windows laptop, until its PSU cable short-circuited in November 2021 and nearly caught fire.
And, since November, I’ve procrastinated on replacing the 2014 laptop, and have instead been using my work laptop, until I finally got tired of having to open tickets to get back software that the corporate virus/firewall/whatever, for some reason had decided needed to be blocked.
I started the search for a new laptop by googling “best linux laptop 2022”, and found some expensive candidates, that also turned out to be hard to find somewhere to purchase from.
So I flipped the search around, by searching on a couple of online stores, for laptops sorted on price with lowest first, and RAM starting at 8GB, and then using the model to see if others have had success with linux-ification of them. One thing I discovered, was that RJ45 network connectors seems to have gone out of fashion, and I really wanted a cabled NIC for PXE boot.
But looking at gradually more expensive and capable laptops, i eventually got to the Acer Aspire 5 A515-45 which was a bit more expensive and a bit bigger than my original plan, but it had an RJ45 port. Also, the debian wiki page on that model looked promising, so I ordered one, and the next afternoon it was delivered on my doorstep.
The first hurdle was getting PXE boot working on a laptop with UEFI BIOS. This is what derailed my install in 2014 and it gave me a bit of work this time around, and the documentation is somewhat fragmented and confusing.
Short story: PXE boot of the debian installer on an UEFI BIOS computer works.
You just have to be careful how you set up the TFTP setup for the installer, i.e. what you set the TFTP root to, what symlinks your make and what boot loader you use.
What I did:
- Set up dnsmasq in my rPi raspbian router/firewall (Using a Raspberry Pi 2 Model B as a router/firewall for the home LAN)
-
Downloaded the netboot.tar.gz file for debian bullseye
cd /tmp/
wget https://deb.debian.org/debian/dists/bullseye/main/installer-amd64/current/images/netboot/netboot.tar.gz
-
Unpacked netboot.tar.gz into the TFTP root and added some symlinks necessary for UEFI BIOS PXE boot
mkdir -p /var/lib/tftpboot
cd /var/lib/tftpboot/
tar zxf /tmp/netboot.tar.gz
ln -s debian-installer/amd64/grubx64.efi .
ln -s debian-installer/amd64/grub .
-
Added config for dnsmasq PXE boot to /etc/dnsmasq.conf (bootnetx64.efi is used in place of pxelinux.0, since we’re PXE booting a computer with an UEFI BIOS):
dhcp-boot=debian-installer/amd64/bootnetx64.efi
enable-tftp
tftp-root=/var/lib/tftpboot
-
- Configure the BIOS as outlined in “Installing Ubuntu Linux on Acer Swift SF114-32”
- Held down F2 during boot to get to the BIOS setup
- Checked the BIOS version, in case that information would be significant during troubleshooting (it wasn’t in this case, but you never know). The BIOS version was 1.10
- Selected the Security tab and added an admin password, to unlock all features in the BIOS setup menus
- Selected the “Boot” tab and disabled secure boot
- Selected the “Main” tab and enabled “Network Boot” and “F12 Boot Menu”
- Then selected the “Boot” tab again and moved “IPV4 PXE boot” as the first boot alternative
- Pressed F10 to do “Save and Exit” from the BIOS
With PXE boot and BIOS settings in place, and a network cable connecting to the home LAN switch, the laptop booted into the debian installer.
I selected “Install” and ran through the installation using mostly defaults for everything.
The places where I didn’t select defaults, were
- The HTTP server for the debian archive (I selected one near to me)
-
The partition table created automatically had a 1GB swap partition
nr size type name 1.0 MB FREE SPACE #1 536.9 MB B f ESP #2 510.5 f ext4 / #3 1.0 GB f swap swap 335.4 kB FREE SPACE The suggestions on the internet, is that if you’re planning to do hibernate (which I may want to), swap should be 1.5 times physical memory, which in this case is 24GB. So I manually edited the partition table to get a 24GB swap partition and use the stuff in between the UEFI required ESP partion as ext4 containing the / filesystem:
nr size type name 1.0 MB FREE SPACE #1 536.9 MB B f ESP #2 487.6 GB f ext4 / #3 24.0 GB f swap swap 335.4 kB FREE SPACE - Added MATE desktop to the install, in addition to the by default selected Gnome
- Swapped the gdm3 display manager with lightdm
The install proceeded without any complications or error messages, and when the message came to reboot, I yanked the network cable (so the laptop wouldn’t boot back into the installer), and breathed a sigh of relief, when the laptop booted into a lightdm login and let me log into the MATE desktop (I didn’t save the windows installation, so returning the laptop on failure, probably wouldn’t have been an option).
I rebooted the laptop, and held down F2 during boot to get into BIOS, and in the “Boot” tab, and moved the entry “*” before any of the network boot options, so that I wouldn’t have to pull the network cable while rebooting.
But no wireless NIC was present:
root@marquez:~# ip link show
1: lo: <LOOPBACK,UP,LOWER_UP> mtu 65536 qdisc noqueue state UNKNOWN mode DEFAULT group default qlen 1000
    link/loopback 00:00:00:00:00:00 brd 00:00:00:00:00:00
2: enp3s0: <BROADCAST,MULTICAST,UP,LOWER_UP> mtu 1500 qdisc pfifo_fast state UP mode DEFAULT group default qlen 1000
    link/ether c0:18:50:91:da:3e brd ff:ff:ff:ff:ff:ff
root@marquez:~#
I thought with horror back to the things I’ve done over the years, to get a working wireless NIC in my GNU/linux laptops.
However fixing this problem turned out to be a lot less work than I initially feared. It ended up being just installing a debian package from the non-free section, and finding a newer kernel than the one currently used by debian stable.
The debian wiki page for Acer Aspire 5 A515-56 said the laptop should have an Intel wireless NIC (requiring firmware-iwlwifi), but this was not the case for Acer Aspire 5 A515-45.
The Acer Aspire 5 A515-45 has a wireless NIC called “MEDIATEK Corp. Device 7961” according to the output of the lspci command:
...
03:00.0 Ethernet controller: Realtek Semiconductor Co., Ltd. RTL8111/8168/8411 PCI Express Gigabit Ethernet Controller (rev 15)
04:00.0 Network controller: MEDIATEK Corp. Device 7961
...
The description of the firmware-misc-nonfree package mentions “7961” 4 times, all related to Mediatek and with the last to relating to WiFi behaviour:
- MediaTek MT7961 bluetooth firmware, version 20210223142901 (mediatek/BT_RAM_CODE_MT7961_1_2_hdr.bin)
- MediaTek MT7921 hdr firmware, version 20210122002654a (mediatek/WIFI_MT7961_patch_mcu_1_2_hdr.bin)
- MediaTek MT7921 firmware, version 20210122002730 (mediatek/WIFI_RAM_CODE_MT7961_1.bin)
So I added non-free to the apt lines in /etc/apt/sources.list:
deb http://ftp.no.debian.org/debian/ bullseye main non-free
deb-src http://ftp.no.debian.org/debian/ bullseye main non-free

deb http://security.debian.org/debian-security bullseye-security main non-free
deb-src http://security.debian.org/debian-security bullseye-security main non-free
and installed firmware-misc-nonfree:
apt update
apt install firmware-misc-nonfree
and then I rebooted.
But this was not enough to magically make the wireless NIC appear.
According to the result of a google search, kernel version >=5.12 was required for using the MediaTek 7961 wireless NIC. And debian 11 “bullseye” only comes with kernel 5.10.
The current kernel used by debian testing and experimental was 5.18. And luckily, the 5.18 kernel had also made its way into bullseye backports.
So I added backports to /etc/apt/sources.list:
deb http://deb.debian.org/debian bullseye-backports main
and then installed the kernel from backports:
apt update
apt install linux-image-amd64/bullseye-backports
and rebooted.
And after the reboot the wireless NIC showed up in the “ip link show” command:
sb@marquez:~$ ip link show
1: lo: <LOOPBACK,UP,LOWER_UP> mtu 65536 qdisc noqueue state UNKNOWN mode DEFAULT group default qlen 1000
    link/loopback 00:00:00:00:00:00 brd 00:00:00:00:00:00
2: enp3s0: <BROADCAST,MULTICAST,UP,LOWER_UP> mtu 1500 qdisc fq_codel state UP mode DEFAULT group default qlen 1000
    link/ether c0:18:50:91:da:3e brd ff:ff:ff:ff:ff:ff
3: wlp4s0: <NO-CARRIER,BROADCAST,MULTICAST,UP> mtu 1500 qdisc noqueue state DOWN mode DORMANT group default qlen 1000
    link/ether 8e:f8:83:9e:69:e6 brd ff:ff:ff:ff:ff:ff permaddr e0:0a:f6:b7:2e:cd
sb@marquez:~$
And when I clicked on the network icon I saw all wifi networks in the neighbourhood.
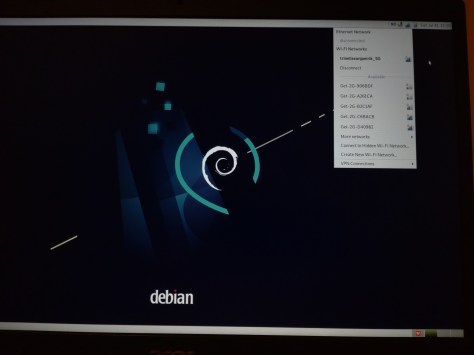
I selected the home WiFi and gave the WPA key, and I was online on wireless.
Everything I’ve tried so far, works. Graphics, sound, touchpad, keyboard, no issues.
Suspend/resume also works fine. The laptops comes out of suspend and connects fine to the home wifi.
So now I have a fully working linux laptop for the first time in 9 years. And this makes me happy!
